Tomb Raider 6: The Angel Of Darkness Walkthrough & Game Guide
Level 14: Neptune's Hall
* You can force the knight fall through the hole, but since Lara does not actually kill him, we do not count him as a kill.
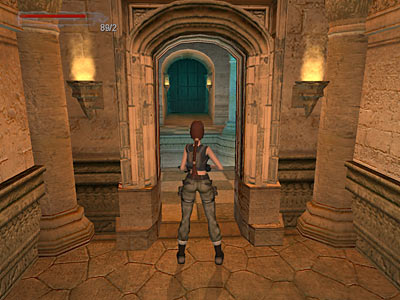
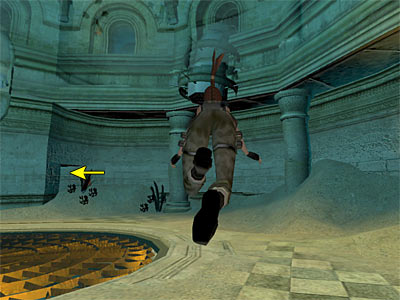
Room with circular opening in the floor - As soon as the level begins, proceed forward and to the either left or right to avoid the fireballs that the knight beyond throws through his sword. If you are hit by a fireball, you can either load your game or drop into the water in the second room. Avoid the circular opening in the first room, because this is a long drop down and Lara will be killed. There are two V-Packer Cartridges in the first room. To get them without injury, you need to stun the knight once at a time. If you cannot get them now, you will have two more chnaces. However, you can force the knight fall through the hole and get rid of him once and for all. To do that, enter the second room and turn to face the doorway (as shown in this screenshot). When the knight passes in front you, equip the Shotgun shoot him a couple of times. Flooding the room below - Go to the second room and drop into the water. Swim down to an underwater room. Take a look around to spot the arched doorway with the moving blades blocking the entrance. You will probably pass through them easily, but if you are having troubles with them, swim between the two horizontal blades. Pull the lever to fill with water the area beneath the first room. Exit and swim upwards through the opening you came from. Climb out of the water and return to the first room. If you did not get the Cartridges before, do it now. Then drop through the hole. Circular room with water - If you examine the room, you will see a Large Health Pack behind the bars. You will get it later, so ignore it for now. There are three doorways in this room but you cannot reach them. Dive and swim through a small opening behind some plants (as shown in this screenshot). Pull the lever on the left to raise the water level in the room outside. Swim back and surface. Now you can reach the three doorways. The rightmost (as you face them), above the opening you swam through before, contains a Vector-R35 Clip, the middle one contains a Large Health Pack and the third one leads you to an opening in the floor. Go there. Jump into the water. Swim down and forward, and get the Large Health Pack you saw before behind the bars. Continue swimming forward and then down through another opening. Get the Large Health Pack at the bottom and swim through the opening of the bars at the back of the tunnel in order to surface and get air and dive. Swim through the opening of the bars and The spikes are coming from every side of the tunnel and Tunnel with crossed spikes - Save your game here, because you may die in the next part. Dive in the water and pass the opening through the bars. As you swim farther, you will see spikes coming from every side of the tunnel. There is also a current that takes Lara to the top of the tunnel and does not help you maneuver her. At least you have enough breath to make it across. Try to swim at the bottom left or right side of the tunnel. It is better if you swim close to the base of the spikes. When you pass through the opening of the bars, you can avoid the next spikes if you swim to the top left. When you reach the T-junction, turn right to surface and get some air. Swim back down and get the Vector-R35 Clip from the entrance of the tunnel (if you did not get it while entering). Swim forward to reach a room with the Water Crystal on a pedestal. When you get it the grating above opens. Swim down and pull the lever on the side of the pedestal to open a door in the room above. Swim upwards to return back to the room with the three doorways. Swim to the top to get some air, then through the door you just opened. You should recognise this room. Beyond you can see the moving blades and the first lever you used, so swim through the opening in the ceiling and climb out of the water at the end. If you did not get the Cartridges before, this is your last chance. Go around the opening in the floor and approach the big gate ahead to return to the Hall Of Seasons.
|
||
| « Level 13: The Hall of Seasons | Index | |
| Last update: 03 March 2009: Text has been improved and all screenshots have been replaced. Also, new screenshots have been added. |
||
Tomb Raider 6: The Angel of Darkness Walkthrough & Game Guide © 2000-2009 www.tombraiderhub.com |
||